How to keep...
my animals in good shape: food for vivarium animals
Piet Mantel & John Boonman
INTRODUCTION
The food industry does not always have a suitable answer to the growing demands of the food requirements for vivarium animals. This food is in the form of pellets, prefab lumps or flakes or (expensive) containers with feeding animals like crickets. Most of the time this has to do with the compulsory demand of these animals for a huge diversity of live (mostly moving) food. The industry sometimes fails by producing ready-to-use feed of an inadequate composition, like some pellets for herbivorous lizards with an inappropriate amount of fibre. The following article summarises tips and tricks for vivarium keepers for collecting feed animals of good quality and offering them to their vivarium animals.
PASTURE PLANKTON
Small lizards and many amphibians prefer a variety of feed invertebrates like pasture plankton, a term used for the mixture of lower animals that live in open fields. Very young animals can often be stimulated to start eating it, because the harvest often contains minuscule insects and spiders. A net made of firm, narrow meshed material fixed on a stout brace can be used to catch numerous insects and other lower animals, especially on a warm and sunny day. A few strokes with the net in dry vegetation give sufficient material to fill up a plastic bag or a marmalade jar. Catching by hand under rocks and stones, in wood, on fences and on walls will result in all kinds of valuable feed animals as well. After rain or in the early morning snails are easily found in numerous places. It makes sense to sort out the various portions and to record which types of feed animals are eaten. Some species of caterpillar, like the one of the speckled moth, sometimes can be collected in large quantities, but are seldomly eaten. Other easily collectable invertebrates like sow bugs, wasps, bees and bumblebees are also rarely eaten.
Do not sample in places where large scale toxicants or fertilisers are being used. Avoid the sides of main roads as well.
CRICKETS
Domestic (brown ones) as well as field crickets (black ones) are sold in specialty stores, sorted by size. Although breeding is not extremely complex, the set-up must be very thorough in order to obtain a satisfactory result. It is therefore only worthwhile to breed these animals when consumption is sufficiently high. Since the prices in the stores are rather expensive, it will soon become an issue. A single Collared Iguana (Crotaphytus collaris) or Eyed Lizard (Timon lepidus) will easily consume hundreds of Guilders a year on crickets.
Crickets need a lot of heat (at least 25ºC, preferably 30ºC), are excellent climbers and are able to gnaw through almost anything. Therefore breeding must be executed in well-isolated, perfectly closed but well-ventilated containers with smooth interior walls. Ventilation openings (primarily important in smaller containers) must be closed with fine meshed screens. For large scale breeding a wore-down freezer is often used. For heating the container, a lamp of some 60 W connected to a thermostat or an infrared heater emitting no visible light can be used. A porcelain heater is very well suited to this task. The reliability of the thermostat is of extreme importance as it usually has to function day in and day out for years. A single breakdown will terminate the breeding. A small 25 W lamp switched on for 16 hours a day is sufficient for lighting and suggesting a diurnal rhythm. A small ventilator will maintain sufficient air circulation. To enlarge the necessary living area, the container can be furnished with wads of paper. A plastic tray, some five cm deep, and filled with moist sand or potting soil, can be used by the adult females for egg deposition. Since crickets are excellent diggers, a fitted piece of metal wire gauze must be placed on the earth of the laying tray to avoid the eating of the eggs and grubs by the adults. If the tray is replaced every other day and if the removed tray is placed in a second incubator, a constant supply of crickets is guaranteed. The earth will dry out rather fast so cover the tray until the young crickets hatch, between 10-14 days. Crickets can be fed with chicken rearing formula, a reasonably priced commodity. For water supply some additional greens or fruit must be offered. Cabbage is especially well-liked. Be careful of excessive humidity in the breeding chamber as it will inevitably result in a mite plague. It is recommended to watch the breeding every day so any occasional problems can be immediately dealt with.
Attention: newborn crickets are able to escape through the smallest holes and will survive in houses. Only a few neighbours and house-mates will appreciate that.
GRASSHOPPERS
This food source can be bought in specialty stores as well, but the costs are rather high, even more expensive than crickets. Breeding of migratory grasshoppers is very productive and the benefit, like crickets, is the continuous availability of prey of various sizes. The pro of grasshoppers is that they do not fear light. Crickets, wax moths and many other insects will disappear immediately underneath a stone when there is light, while grasshoppers expose themselves directly to sunlight or lamps, the very places where lizards are usually basking. In winter, feeding will be problematic as fresh grasses, notably the more stout ones like reed or raft grass, are basically the only suitable feedings for migratory grasshoppers. Before starting the breeding it is wise to explore the possibility of a constant supply of food. In late spring, summer and autumn raft grass and reed are easily found in sufficient amounts alongside canals. In wintertime evergreen bamboo is the best choice or home-cultivated corn sprouts and wheat plants. Do not use genuine production wheat seed. All too often it is treated with toxic substances. Place food inside the breeding container in a jar of water to keep the grasses fresh. Care must be taken to not give the grasshoppers access to the water jar as they will drown in it. Therefore the grasses must fit tightly in the jar.
One of the two types of grasshoppers that are usually bred, the Desert Locust (Schistocerca gregaria), is sometimes willing to eat Scottish cabbage, while the more productive species, the African Migratory Grasshopper (Locusta migratoria) will not.
A container of 60x60x50 cm is a comfortable size. It makes sense to keep the animals on a metal grid, so that droppings can be collected in a tray. Such a construction will allow for cleaning the housing without letting the grasshoppers escape. The front screen must be made of glass and the other sides must be well isolated. One side has to contain a small door. Heating can be accomplished by light bulbs connected to a thermostat. Part of the heating should be mounted underneath the metal grid. Direct daylight is beneficial to the animals. Optimal breeding temperature is 34°C. The housing must be furnished with some branches, which will be used by the animals primarily during shedding. In addition to the usual feeding a tray with wheat bran must be provided and some tissue soaked with sugar solution. Cannibalism is prevented by elevating the blood sugar level of the grasshoppers. Adult animals will need an oviposition tray as well. A plastic dish containing moist peat dust is suitable. Breeding is started with some ten adult pairs. Mature Schistocerca of both sexes are yellow. Mature male Locusta are yellow and females are brown. When the animals are turning green, this indicates that too few pairs were employed at the start. The reason for this is that two forms exist, migratory and non-migratory, and the form depends on the density of population. The green form is not very productive. If things work well, females will soon produce their egg parcels in the laying trays. After one week the tray should be replaced. The trays, fitted with a cover, are to be incubated at 34°C. Eggs will come out in roughly 11 days. The cover must then be removed. Within three to four weeks the animals mature to adulthood and will produce eggs within another two weeks.
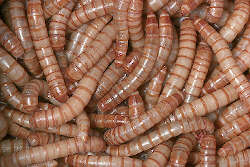
MEALWORMS
Mealworms (Tenebrio molitor) can be obtained in various pet stores and are sold by weight. A complete lifecycle takes several months, so that it is only worthwhile to breed them at home when large quantities are required. The giant and the small 'mealworms' (Morio (Zophobas morio) and Buffalo (Alphitobius diaperinus) worms respectively are in fact two different species) are only sold in specialty stores. Breeding these two is somewhat more problematic and therefore will not be considered here.
For breeding, a smooth, glutton-proof container that can be covered with a screen lid is essential (the worms are larvae of beetles that are able to fly). Fill the container with a thick layer of wheat bran mixed with an equal amount of flour and some yeast. Mix in some wads of paper or pieces of corrugated cardboard to keep things well aerated. Add some bread crusts every so often. Regularly moisten pieces of fabric and lay them on top of the filling.
Breeding begins with some mealworms. In between the pieces of fabric some moist food should be laid: carrots, fruit, lettuce or cauliflower. The food should never get mouldy and the layer of wheat bran must be handled as little as possible. Mealworms are easily collected from in between the fabric. Mealworms can stand low temperatures but a healthy and reasonably paced breeding requires a temperature of at least 20°C.
The benefit of home breeding is the constant availability of small mealworms and beetles. Mealworms can be upgraded by providing them for a couple of days with more expensive feed (like chicken rearing formula) to fill their stomachs with high-quality material. Feeding pellets that are in use in the bio-industry are useful. Droppings can easily be sieved out of the feed. Be aware of possible hazardous additions to these commodities.
FLIES AND MAGGOTS
It makes little sense to set up a complete breeding of Blow Flies. Maggots are sold in every angling shop, often the chrysalides as well (usually for a minimal amount of money). The maggots themselves can be used and they will pupate very soon after purchase due to the breeder's method of collecting. The brown chrysalides will produce flies within five to six days. These can be kept in the refrigerator for some time after being fed a dry mixture of five parts milk powder, five parts sugar and one part brewer's yeast. Some water must also be provided. This feeding is essential as otherwise only an empty and poorly digestable fly skin will result.
Maggots can be conserved in sawdust in a cool place for some time, which can extend the use of a bought quantity. Do not use coloured larvae as these are artificially stained to make them more attractive to fish (or anglers?). Those who want to breed flies themselves are better off using an artificial substrate rather than using meat. Such a substrate is easily prepared in the following fashion: dissolve 7 g agar in 175 ml of boiling water. Dissolve 35 g full fat milk powder and 35 g brewer's yeast in another 175 ml of water. Combine these two solutions and let cool in a 1 litre container. This substrate can then be inoculated with fly eggs. The material is covered with sawdust and breeding will begin. Eggs can be collected by giving a colony of flies (in another container) a tissue soaked with full fat milk. Eggs can be recognised as small white rods. At 25ºC such a substrate will produce approximately 1000 flies within 11 days.
FRUIT FLIES
Fruit flies can also be bought in specialty stores. There is both a flying and a non-flying variety. At an incubation temperature of 25 ºC a complete cycle will take about 2 weeks. Mashed ripe fruit can be used as a substrate by converting it into a firm porridge by adding flour or gelatine. A piece of yeast will accelerate the necessary fermentation process and a drop of propionic acid will prevent moulding. Make a dry resting place for the flies in the form of paper cylinders stabbed into the substrate or by some wood shaving or straw. This will absorb the moisture that is always present on top of the substrate.
WAX MOTHS
Nowadays wax moths are cultivated on an artificial substrate that is available as a starting material in specialty stores, rather than on genuine honeycomb. Those who want to prepare their own substrate can proceed as follows: mix 900 g of wheat flour with 250 g skimmed milk powder, 300 g wheat germ and 150 g brewers yeast powder. Heat 100 g honey with 120 g glycerine and 60 g yellow wax in a pan until the wax melts. Add the powder mix and homogenise in a blender until a firm porridge is formed. Add some of the solid material until the substance becomes granular. The substrate is now ready for use.
Wax moth larvae are bred in well-closed plastic containers of 20x20x8 cm with a ventilation opening covered with fine meshed metal screens. These larvae can devour almost anything except hard plastic, concrete, glass and steel so do not cut down on the (expensive) screen material. Breeding commences by putting some moths, or eventually larvae, in a container with substrate. Put the boxes in a warm place. Regularly add some fresh food and collect larvae or moths and that's all there is to the breeding process. Be aware of the flight capabilities of the moths. The containers must be opened inside the vivarium.
When debris starts piling up in the containers a substantial number of moths can be collected and put aside in a box containing wads of non-greasy paper. The moths will lay their eggs on it in a clearly visible way. These can be used to set up a new breeding colony. The remaining moths and larvae from the old container can be re-used.
TUBIFEX
Nowadays it is no longer worthwhile to breed and collect tubifex. Every aquarium shop will sell the worms year round. Tubifex is best conserved in smaller portions in cold water. The water must be changed regularly and the dead worms washed away.
WATER FLEAS
Water fleas can be collected in clean, vegetation-depleted, but nutritious, sunny waters, such as rural pools, gravel quarries, ditches or shallow bends in rivers. Do not collect in the middle of the day when it is hot. Use a firm net with a long handle and transfer the harvest into jars, buckets or other containers with a substantial amount of air on top of the water. At home these small crustaceans must be placed into large containers with fresh water of the same temperature. It makes sense to aerate the water thoroughly before use.
Water fleas can easily be grown in pools or dug-in drums in the garden. Some shade must be provided in the summer and during the winter freezing must be prevented. The organisms can be fed by the soluble parts of organic fertilisers, blood or fishmeal. Be wary of over-nutrition. Water fleas can be bought occasionally, but it is only worthwhile if small amounts are required.
MOSQUITO GRUBS
Mosquito grubs are easy to catch. The red ones (in some areas known as bloodworms) live in the mud of all kinds of water. The white, transparent ones live in the middle water layers and the black ones live at the surface. The red ones can be bought in aquarium stores. They can be kept for a short time in cool, running water. Once in a while white larvae can be bought in small portions. Black larvae are easy to grow in large amounts in a manner comparable to water fleas: in a pool or a barrel in a shady place in the garden with some organic fertiliser to promote breeding. The only drawback is that black mosquito grubs will produce stinging mosquitoes.
EARTHWORMS
The methods for obtaining earthworms are through breeding, buying at the angler's shop or collecting in the field, preferably after rain or during digging activities. An elegant method of collecting consists of putting a spade into the ground and slamming against it. Earthworms will soon appear. Home breeding is also possible. Use trays of at least 50x50x30 cm filled with moist garden mould mixed with rotten leaves. The surface should be covered with an amount of uncooked greens, fruit or potato remnants. On top of this place a slightly moist fabric. The tray should be kept in a cool place. Breeding will occur with some 100 worms per tray. Regular feeding is necessary. The tray must be covered with wire gauze to prevent escaping and some light must stay on in the room where the tray stands.
Many species of earthworm exist, but not all of them are edible. The yellowish, somewhat stiff specimens from the compost heap are not favoured by many of our animals. We prefer to use the red forms as starting material.
SNAILS
Snails, either with or without shells, are not easily bred in large numbers, nor can they be bought. Therefore they must be collected. This can be done all year round in shady gardens, underneath fences, in nettle bushes, at the foot of stone walls or in Ligularia beds. Most snails are best collected early in the morning or after a rain shower. Shelled snails in particular can be conserved for a considerable period of time in marmalade jars with perforated covers and some vegetables for food.
MICE AND RATS
If mice or rats are frequently needed, it becomes necessary to breed them at home as buying will soon become very expensive.
For a breeding pair of mice (or a trio, one male and two females) a housing of 45x25x15 cm is sufficient. For rats the housing must be at least twice as big. The special plastic laboratory containers with a bar cover and a drinking bottle are optimal. Although sawdust is most often used as a substrate, peat dust will absorb the urine odour better, however the dust will be more pronounced. A layer of hay will be appreciated. Special rodent pellets or other commodities like bread, cereals or bran can serve as food. Using pellets will result in a much higher productivity. Two or three times a week some greens must be served as well as a slice of carrots or something similar.
Mice are fertile in approximately eight weeks. A mouse will eat 3-6 g of food a day, while lactating females consume much more. Pregnancy will take 19 days for mice and females are fertile again immediately after delivery. One female can produce 100 offspring a year. The young are born nude and blind. The nest must be treated carefully during the first four or five days to avoid the chance of the female killing her young. The eyes will open in ten days and after three weeks the youngsters become independent. Males will not fight during the first three months, but thereafter the chance of fighting will increase. Pregnancy for rats takes 20-23 days and after 3-4 months they can breed again. A mature rat will eat some 15 g of food a day.
Several types of rats and mice exist. For breeding use docile and non-aggressive forms. It is better to not use wild-caught specimens as these are pugnacious and often carry parasites.
FISH
Some snakes only eat fish and often will only eat live ones. In that situation one is obligated to go fishing during the summer. That sounds rather easy but it turned out to not always be possible to find the right kind of fish. Domestic species of fish are often too big and juvenile fish are not always available. Home breeding of fish takes a lot of time and space but it is possible when species are chosen that are easy to breed, like the famous Poeciliids (Guppy, Poecilia reticulata). It is quite a job and it is worthwhile to consolidate a sufficient fish supply before breeding fish-eating animals.
It becomes much simpler if dead fish can be offered. A deep-freeze supply can be set up. A suitable species that is likely to be eaten and is small and easy to obtain is the Smelt (Osmerus eperlanus). Angler shops will sell frozen Smelt all year round but they can be bought fresh as well, primarily during the autumn.
The use of frozen fish may be dangerous. Many species of fish contain the enzyme thiaminase that breaks down vitamin B1 (=thiamine). This process will continue in frozen fish so that over time they will no longer contain vitamin B1. Snakes that are fed frozen fish will develop a deficiency in that vitamin. This deficiency will manifest itself through uncoordinated twisting movements by the snakes. The fault can easily be cured by vitamin injections, but prevention is much simpler. Give the animals an occasional minute amount of vitamin B1.
PLANTS
For vegetarian feeding wild as well as cultivated plants can be used. Herbs from nature are subject to the same consideration as mentioned in the section on pasture plankton: choose a collection area not too close to a motorway or polluted in any other way. Over-fertilised areas should be avoided. It is wise to keep on hand a good identification key or guide book since several plant species are poisonous.
Vegetables, and to a lesser extend fruit, are best grown in home gardens. It is only in this case that the application of artificial fertilisers, herbicides and insecticides can be observed. Since this is not always possible, one has to shop at the grocery store, especially in winter. Always use fresh and not faded, withered or mouldy vegetables. Nitrate content of (green house) vegetables can be very high, especially during winter if they are conserved too long or under wrong conditions, levels of toxic nitrite will become unacceptably high. For the same reason it might make sense to obtain leafy vegetables in winter from countries where the sun shines longer (usually around the Mediterranean), although often more toxic compounds are used in those countries. Wash well before use. In addition: Do not offer a new portion to all animals at one time to limit an eventual risk.
Sprouts (taugé, alfalfa) can be grown at home the year round by letting the seeds germinate on a moist substrate (paper, sponge, fabric). Seeds can be obtained from macrobiotic stores or megastores. The sprouts will be available within a short time and if changing cultures are applied, fresh food will be available at any necessary moment.
Dandelion, appreciated by many vegetarian reptiles, can be grown in winter in light places in flowerpots. Plants, including pots, can be placed in a vivarium. When the greens are eaten off they can be placed back in the cultivation area and after some time will produce fresh greens. Collard greens can be grown in a comparable fashion from seeds, let the animals graze off the greens and restart the cultivation outside the vivarium.